How to Edit Audio Track From Imported Video Davinci
There are a lot of questions and doubts on the relationship between video and audio clips in DaVinci Resolve.
Like…
How to link or unlink audio from video, how to delete audio or video without affecting the other?, etc,.
You should clearly know how both video and audio are connected in the timeline in Resolve to work with them independently.
Today, we'll see how to link, unlink, delete, insert audio-only & video-only clips into the timeline.
Let's dive right in!
- How to Unlink or Split Audio and Video in DaVinci Resolve
- How to Remove or Delete Audio From Video in DaVinci Resolve?
- How to Delete Audio without Deleting Video in DaVinci Resolve?
- How Do I Delete a Video but Keep the Audio in DaVinci Resolve?
- How to Add Audio to Video in DaVinci Resolve?
- How to Link Audio and Video in DaVinci Resolve?
- How to Link Multiple Audio and Video Clips Together in DaVinci Resolve?
- How to Insert Video Only into the Timeline in DaVinci Resolve?
- How to Insert Audio Only into the Timeline in DaVinci Resolve?
- How Does Linking and Unlinking Work on Fairlight Page?
How to Unlink or Split Audio and Video in DaVinci Resolve
By default, a clip has both video and audio linked together.
But you can unlink audio from the video.
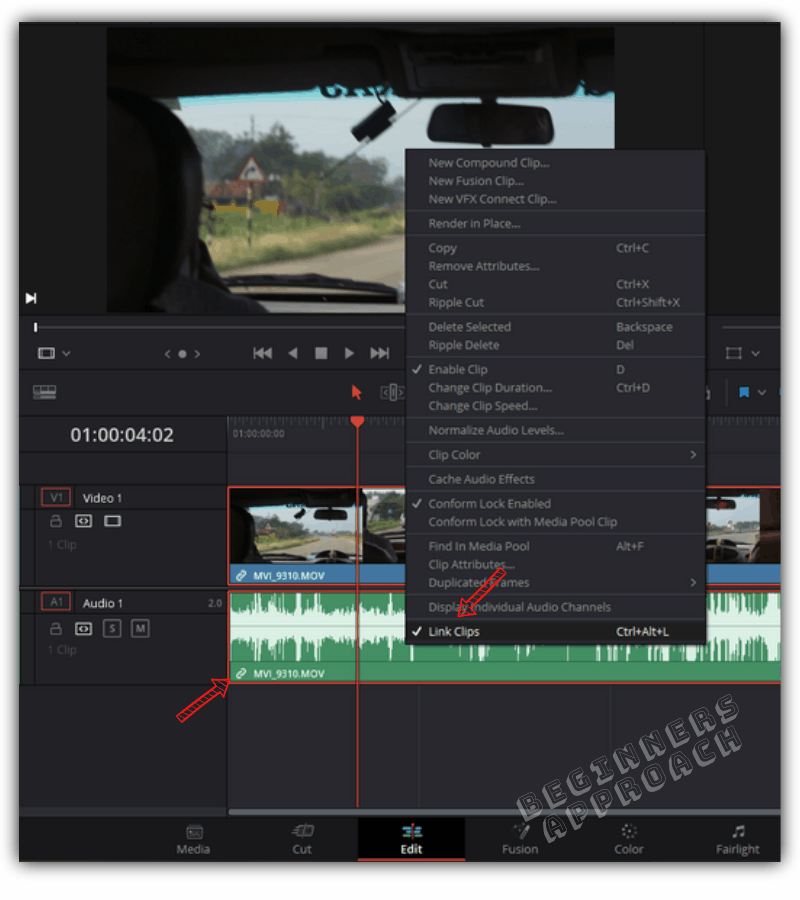
So, here is how to unlink audio from video in Resolve:
- Drag & drop the clip into a timeline (If not already).
- Right click on the clip.
- Un-select "Link Clips". Shortcut = "Ctrl + Alt + L" or "Option + Command + L"
- The chain icon will disappear.

The audio and video are separated and are independent.
How to Remove or Delete Audio From Video in DaVinci Resolve?
- Unlink the audio from video using "Ctrl + Alt + L" or "Option + Command + L".
- Click on the audio clip so that only the audio part is selected (if not then, click on somewhere else and again click on audio to select it).
- Press "Backspace" or right click on the clip and select "Delete Selected".
- (Pressing "Delete" button is not recommended.)
(Now when you click "Delete" button, sometimes it can delete the video clip or other clips as well apart from your audio – which is undesirable. Click on "How To Delete Gaps & Clips in DaVinci Resolve (the Right Way!)" to learn more about deleting.)
There is another really quick way to delete audio from video while they are still linked.
How to Delete Audio without Deleting Video in DaVinci Resolve?
- Press "Alt" or "Option" while clicking the audio. (This will select only the audio and not video).
- Hit "Backspace" or right click on the clip and select "Delete Selected", to delete only the audio.
- (Don't press "Delete" button).
Hitting "Delete" button will remove both the audio and video even after unlinking. Hence "Backspace" is recommended.
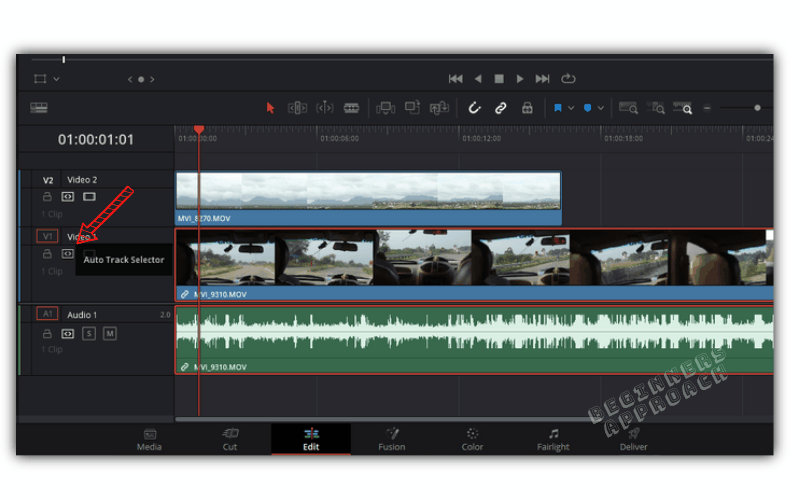
The reason is that, by default, "Auto Track Selector" is turned on for both the audio and video tracks, when you place the clip in the timeline.

So if you prefer to hit "Delete" button, then make sure "Auto Track Selector" is turned off for the track where your video lives.
How Do I Delete a Video but Keep the Audio in DaVinci Resolve?
- Press "Alt" or "Option" while clicking the video. (This will select only the video and not audio).
- Hit "Backspace" or right click on the clip and select "Delete Selected" to delete only the video.
- (Don't press "Delete" button, which might undesirably delete audio and other clips).
How to Add Audio to Video in DaVinci Resolve?
Sometimes you might need to add music, background soundtrack, or a sound effect to your video.
First, you need to import your audio clip into Resolve:
- Go to "Edit" page.
- Click on the "Media Pool" tab.
- Press "Ctrl + i" or right click and select "Import Media".
- Navigate to your location and select your audio clip.
- Click on "Open".
- It now imports the audio clip into "Media Pool".
Now, after importing, you need to know which part of the audio file you will need.
Double click on the audio clip. It will open up in the "Source Viewer".
Set in point (press "i") and out point (press "o") of the required audio part. (Or if you need the whole audio, no need to set in and out).
Drag and drop the audio clip (from media pool) below your desired video.
The selected part of the audio will be inserted in to the audio track. Now you can adjust your audio to match with your video.
How to Link Audio and Video in DaVinci Resolve?
After you have done changes to your audio track, it's better to link the audio (music or sound effect or bgm) to the corresponding video.
Here is how you link audio and video in a timeline:
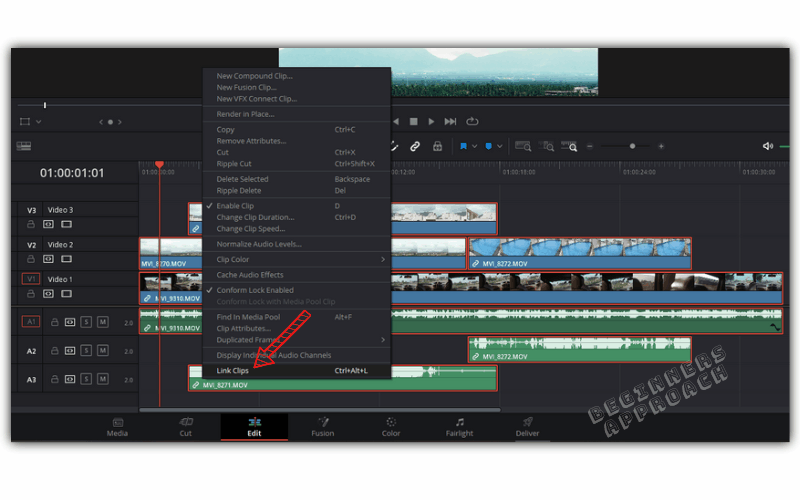
- Select both the video and audio by "Ctrl" or "Cmd" clicking.
- Right click -> select "Link Clips". Shortcut = "Ctrl + Alt + L" or "Option + Command + L"
- Both the audio and video are linked together.
So whenever you move your video, you can be rest assured that the audio also moves along with it. There won't be any out of sync issues!
Related Article:
How to Sync Audio / Clips in DaVinci Resolve (Quickly)?
How to Link Multiple Audio and Video Clips Together in DaVinci Resolve?
You can link many video and audio clips together, so that they act as one unit. You can move them wherever you want in the timeline, with no out of sync issues.
This is how you link multiple clips together:
- Select all of your desired video and audio clips by "Ctrl" or "Cmd" clicking.
- Right click -> select "Link Clips". Shortcut = "Ctrl + Alt + L" or "Option + Command + L"
- All of the clips will be linked together!

How to Insert Video Only into the Timeline in DaVinci Resolve?
- Go to "Edit" page and import the video clip into the "Media Pool".
- Double click on the video clip. It will open up in the "Source Viewer".
- Hover your mouse on the "Source Viewer".
- Click on the video only icon, drag and drop it onto the timeline.
- Video only clip will be inserted either into a new track or existing track (based on where you drop it).

Alternatively, you can also hold "Alt" key while clicking anywhere on the "Source Viewer", then drag and drop onto the timeline. The video only portion will be inserted.
How to Insert Audio Only into the Timeline in DaVinci Resolve?
- Go to "Edit" page and import your clip into the "Media Pool".
- Double click on the clip. It will open up in the "Source Viewer".
- Hover your mouse on the "Source Viewer".
- Click on the audio only icon (waveform), drag and drop it onto the timeline.
- Audio only clip will be inserted either into a new track or existing track (based on where you drop it).

Alternatively, you can also hold "Shift" key while clicking anywhere on the "Source Viewer", then drag and drop onto the timeline. The audio only portion will be inserted into the audio track.
How Does Linking and Unlinking Work on Fairlight Page?
When you work on audio clips in the "Fairlight page", it's a good practise to unlink audio and video before making any changes.
Because if you edit, cut or delete a linked audio clip, the same will be applied to the video clip (which won't be visible in "Fairlight" page). So beware!
In the "Edit" page, unlink the audio clips. Lock the video tracks, if needed, so that they are not affected when you work on the corresponding audio clips in "Fairlight" page.
You may also be interested in the below posts:
- Does DaVinci Resolve Have Free Music? (Read This First!)
- How to Fade Clips in DaVinci Resolve (in Less than 30 sec)
- How to Split Audio Channels / Tracks in DaVinci Resolve (Explained!)
- How to Normalize & Balance Audio Levels in DaVinci Resolve? (Quick Tips)
- How to Reverse & Retime Audio in DaVinci Resolve (Must Read!)
- How to Make Voice Deeper in DaVinci Resolve? (For Beginners)
- (Quickly) Remove Background Audio Noise in DaVinci Resolve
- Fix Audio Recording Issues in DaVinci Resolve (Step-by-Step Guide)
How to Edit Audio Track From Imported Video Davinci
Source: https://beginnersapproach.com/davinci-resolve-audio-video-clips-link/
0 Response to "How to Edit Audio Track From Imported Video Davinci"
Post a Comment